It was a balmy Saturday evening in early summer, the kind where the cicadas start their chorus just as the sun begins to dip behind the oak trees. I was standing in my kitchen, the windows cracked open, and the scent of fresh cilantro drifted in like a promise of something bold and bright. I had just pulled a tray of homemade tortillas out of the oven, still warm and pliable, when the idea struck me: what if I could marry the comfort of a classic pizza with the fiesta‑filled flavors of a Mexican taco? The moment I imagined layering smoky ground beef, melty cheese, and a splash of lime on a crisp tortilla base, my mouth started watering, and I knew I had stumbled upon a dish that would become a family staple. Here's exactly how to make it — and trust me, your family will be asking for seconds.
Picture this: you lift the lid off a bubbling pan, and a cloud of fragrant steam rushes out, carrying hints of cumin, roasted corn, and a whisper of charred pepper. The cheese stretches in golden ribbons, the salsa glistens like ruby jewels, and the edges of the tortilla turn a perfect, crunchy amber. That first bite is an explosion of textures—crunch, chew, melt—while the flavors dance between smoky, tangy, and a subtle heat that teases without overwhelming. I remember the first time I served this to my teenage niece; she declared it “the best thing I’ve ever eaten on a crust,” and that’s the kind of reaction that makes a home cook’s heart swell with pride. But wait—there’s a secret trick hidden in step four that will take this dish from delicious to downright addictive, and I’m saving that revelation for later.
You might be wondering why this recipe stands out among the countless “Mexican‑pizza” variations you see online. The answer lies in the balance of fresh, high‑quality ingredients and a few cooking techniques that lock in flavor while keeping the dish approachable for cooks of any skill level. I’ve spent countless evenings tweaking the spice blend, testing different cheese combinations, and even experimenting with the type of tortilla to get that perfect crunch without sacrificing tenderness. The result is a recipe that feels like a celebration on a plate, yet it’s simple enough to whip up on a weeknight when everyone’s craving something exciting. So grab your skillet, preheat your oven, and let’s dive into the magic that will have you craving this Mexican pizza instantly.
🌟 Why This Recipe Works
- Flavor Depth: The combination of seasoned ground beef, smoky chipotle salsa, and fresh lime creates layers of taste that evolve with each bite, keeping the palate engaged from start to finish.
- Texture Harmony: A crisp tortilla base provides a sturdy foundation, while the cheese melts into creamy pockets, and the veggies add a satisfying crunch that prevents the dish from feeling soggy.
- Ease of Execution: All components can be prepared on a single stovetop and finished in the oven, meaning you spend less time juggling pans and more time enjoying the aromas.
- Time‑Smart: With just 15 minutes of prep and a 30‑minute bake, you get a restaurant‑quality meal without the long wait, perfect for busy families.
- Versatility: The base can be swapped for a low‑carb cauliflower crust, or you can turn it into a handheld taco‑pizza for a fun party bite.
- Nutrition Boost: By using lean ground turkey or adding black beans, you increase protein and fiber while still indulging in that cheesy goodness.
- Ingredient Quality: Fresh herbs, high‑quality cheese, and authentic Mexican spices elevate the dish from a quick fix to a memorable feast.
- Crowd‑Pleaser Factor: The familiar pizza format invites even picky eaters, while the Mexican twist introduces them to new flavors in a comforting package.
🥗 Ingredients Breakdown
The Foundation
The base of this Mexican pizza is a set of small corn or flour tortillas, each about 6‑inch in diameter. I prefer corn tortillas for their authentic flavor and natural crunch, but if you love a softer bite, a flour tortilla works just as well. Look for tortillas that are fresh—ideally from the bakery aisle or a local tortilla maker—because they’ll hold the toppings without tearing. If you’re aiming for a lower‑carb version, try a cauliflower tortilla; it adds a subtle sweetness and a light texture that pairs beautifully with the bold toppings. The secret to a perfect crust is a quick flash‑fry in a hot skillet with a drizzle of oil, just enough to set the surface and lock in moisture.
Aromatics & Spices
Ground beef (or ground turkey for a leaner option) forms the heart of the flavor, but it’s the spice blend that truly makes it sing. A classic taco seasoning—cumin, chili powder, smoked paprika, garlic powder, onion powder, and a pinch of cayenne—creates a smoky, slightly spicy backbone. I always add a splash of tomato paste during the browning stage; it deepens the umami and gives the meat a richer color. Fresh garlic, minced just before the meat hits the pan, releases aromatic oils that mingle with the spices, creating a fragrant base you can almost taste before the first bite. If you love extra heat, toss in a finely diced jalapeño or a pinch of chipotle powder for that smoky kick.
The Secret Weapons
Refried beans are the unsung hero of this dish, acting as a creamy layer that prevents the tortilla from becoming soggy while adding a subtle earthy flavor. Choose a low‑sodium, canned variety or, if you have time, mash cooked pinto beans with a bit of olive oil and cumin for a fresher taste. A handful of shredded cheese—half cheddar for sharpness and half mozzarella for melt—creates the gooey stretch that pizza lovers adore. I also love a drizzle of chipotle salsa, which adds a smoky sweetness that balances the acidity of fresh lime juice. Finally, a generous sprinkle of fresh cilantro, diced red onion, and a squeeze of lime right before serving brightens the whole plate with a burst of freshness.
Finishing Touches
The final garnish is where the magic truly happens: sliced avocado for buttery richness, a dollop of cool sour cream to tame any lingering heat, and a scattering of crumbled cotija cheese for a salty punch. If you’re feeling adventurous, a handful of toasted pepitas (pumpkin seeds) adds a nutty crunch that contrasts beautifully with the soft toppings. A quick drizzle of olive oil infused with garlic and oregano can be brushed over the crust just before serving, giving it a glossy finish and an extra layer of flavor. Remember, the goal is to balance boldness with freshness, so each element should complement, not compete, with the others.
With your ingredients prepped and ready, let's get cooking. Here's where the fun really begins...
🍳 Step-by-Step Instructions
Heat a large skillet over medium‑high heat and add a tablespoon of neutral‑flavored oil. Once the oil shimmers, place the tortillas in a single layer, cooking each side for about 45 seconds until they develop a light golden hue and a faint puff. This quick toast creates a barrier that keeps the toppings from soaking the tortilla, and you’ll hear a faint sizzle that signals the crust is forming. Transfer the toasted tortillas to a plate lined with paper towels to absorb any excess oil, then set them aside while you prepare the fillings. The aroma of toasted corn will already start to tease your senses, promising the crunch that’s about to come.
In the same skillet, reduce the heat to medium and add the remaining oil, followed by the minced garlic and diced onion. Sauté for 2‑3 minutes until the onion becomes translucent and the garlic turns a fragrant golden brown, releasing a sweet, caramelized scent that fills the kitchen. Next, add the ground beef (or turkey), breaking it up with a wooden spoon, and let it brown for about 5‑6 minutes, stirring occasionally. As the meat releases its juices, sprinkle the taco seasoning, cumin, smoked paprika, and a pinch of cayenne, stirring to coat every morsel evenly. This is the moment where the flavors meld, and you’ll notice the meat taking on a deep, rich color—an indication that the spices have toasted and are ready to shine.
Stir in the tomato paste and let it cook for 1‑2 minutes, allowing it to caramelize slightly. Then, fold in the refried beans, mixing until the beans are fully incorporated and the mixture looks glossy and cohesive. At this point, the sauce should have a thick, velvety texture that clings to the meat—if it looks too dry, add a tablespoon of broth or water; if too wet, let it simmer uncovered for a minute or two. This step is where the secret trick I promised you comes into play: a quick splash of lime juice (about 1 tablespoon) at the end of cooking brightens the entire mixture, cutting through the richness and adding a zing that makes the flavors pop. Taste and adjust salt or extra chili if you prefer more heat.
Preheat your oven to 425°F (220°C). While the oven warms, assemble the pizzas on a baking sheet lined with parchment paper. Start by spreading a thin layer of the bean‑meat mixture over each toasted tortilla, leaving a small border around the edge. Sprinkle a generous handful of the cheese blend over the top, ensuring an even melt that will turn golden and bubbly during baking. Add any optional toppings now—sliced jalapeños, corn kernels, or black olives—so they have a chance to soften and release their juices.
Place the assembled tortillas in the preheated oven and bake for 8‑10 minutes, or until the cheese is melted, lightly browned, and the edges of the tortilla are crisped to a perfect amber. Keep a close eye on them; the thin crust can go from golden to burnt in a heartbeat, and you’ll want that beautiful, slightly blistered cheese surface. When the timer dings, remove the pizzas and let them rest for a minute; this short pause allows the cheese to set just enough so it doesn’t slide off when you slice.
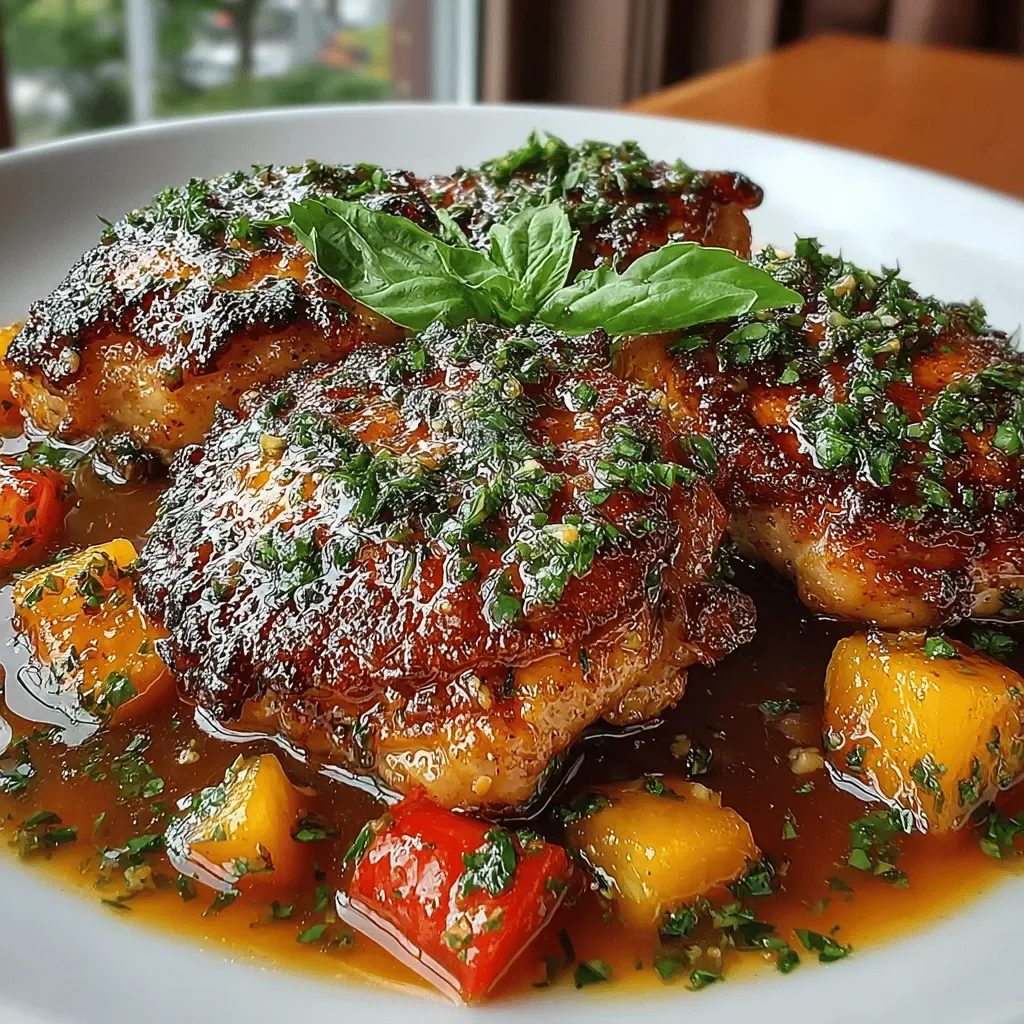
Finish each pizza with a drizzle of fresh salsa, a squeeze of lime juice, and a sprinkle of chopped cilantro. Add sliced avocado and a dollop of sour cream on top, letting the creamy coolness counterbalance the heat from the spices. For an extra burst of flavor, scatter a handful of crumbled cotija cheese and toasted pepitas across the surface. The colors—vivid green cilantro, bright red salsa, creamy white avocado—make the dish as visually stunning as it is tasty, inviting everyone to dig in immediately.
Serve the Mexican pizzas hot, cutting them into wedges with a sharp pizza cutter or a sturdy kitchen knife. Encourage your guests to grab a slice, feel the satisfying crunch, and experience the cascade of flavors that melt together on the tongue. Trust me on this one: the first bite will have you reaching for another, and you’ll hear the delighted sighs of everyone at the table. Pair with a chilled cerveza, a fresh agua fresca, or a simple lime‑infused sparkling water for a complete fiesta experience. And there you have it! But before you dig in, let me share some tips that will take this from great to absolutely unforgettable...
🔐 Expert Tips for Perfect Results
The Taste Test Trick
Before you bake, take a tiny spoonful of the meat‑bean mixture and taste it. This quick check lets you adjust seasoning—maybe a pinch more salt, a dash of extra cumin, or a splash of hot sauce—so the final pizza hits the perfect flavor note. I’ve learned that a tiny tweak at this stage can make the difference between “good” and “wow!” especially when serving guests who love bold flavors.
Why Resting Time Matters More Than You Think
After the pizzas come out of the oven, let them rest for 60 seconds. This short pause allows the cheese to firm up slightly and the toppings to settle, preventing a messy slide when you cut. The result is cleaner slices and a more cohesive bite that showcases each layer without spilling over the edge.
The Seasoning Secret Pros Won’t Tell You
A dash of smoked sea salt added just before serving adds a subtle depth that standard table salt can’t provide. The smoky undertones echo the cumin and chipotle, creating a harmonious background note that makes the flavors linger longer on the palate. I discovered this trick after a trip to a Mexican street market where the vendors used a special salt blend that made every bite unforgettable.
Cheese Blend Mastery
Mixing sharp cheddar with a melt‑friendly mozzarella gives you the best of both worlds: the cheddar’s bite and the mozzarella’s stretch. For a smoky twist, toss in a small amount of smoked gouda or pepper jack; the extra complexity will surprise your diners in the most delightful way. Just remember to keep the cheese evenly distributed so every slice gets that gooey goodness.
The Crunch Factor
If you love an extra crunch, brush the tortilla edges with a mixture of melted butter and garlic powder before the final bake. This creates a golden, aromatic crust that adds a buttery richness and a fragrant finish. I once tried this for a dinner party, and the guests kept reaching for the edges, claiming they were “the best part” of the pizza.
🌈 Delicious Variations to Try
One of my favorite things about this recipe is how versatile it is. Here are some twists I've tried and loved:
Southwest BBQ Fusion
Swap the salsa for a smoky BBQ sauce, add corn kernels, and finish with a drizzle of chipotle mayo. The sweet‑smoky profile pairs beautifully with the beef, creating a flavor bridge between Texas and Mexico that’s irresistibly bold.
Veggie‑Lover’s Dream
Replace the meat with a hearty mix of roasted zucchini, bell peppers, and black beans. Toss the veggies in the same taco seasoning, and you’ll have a plant‑forward pizza that still delivers that satisfying crunch and spice.
Spicy Shrimp Splash
Use peeled shrimp seasoned with chili‑lime rub instead of ground meat. The shrimp cooks in just 3‑4 minutes, adding a succulent, oceanic element that contrasts nicely with the creamy beans and tangy salsa.
Cheesy Queso‑Overload
Add a layer of queso blanco on top of the cheese blend before baking. The extra cheese creates a luscious, gooey crown that stretches like a dream, perfect for cheese addicts who can’t get enough.
Breakfast Sunrise
Top the pizza with scrambled eggs, crumbled chorizo, and a sprinkle of queso fresco. The breakfast twist makes for a hearty brunch that feels like a festive morning fiesta.
Taco Salad Pizza
After baking, pile on a fresh taco salad—lettuce, diced tomatoes, black olives, and a drizzle of ranch dressing. The cool, crisp salad balances the hot, melty pizza, creating a delightful textural contrast.
📦 Storage & Reheating Tips
Refrigerator Storage
Allow the pizza to cool to room temperature before transferring it to an airtight container. It will keep fresh for up to 3 days, though the tortilla may lose a bit of its crispness. To revive that crunch, reheat in a preheated skillet for 2‑3 minutes per side, covering briefly with a lid to melt the cheese without drying it out.
Freezing Instructions
Wrap each assembled, uncooked pizza tightly in plastic wrap, then place them in a freezer‑safe zip‑top bag. They’ll stay good for up to 2 months. When you’re ready to enjoy, bake straight from frozen at 425°F for 12‑15 minutes, or until the cheese is bubbly and the crust is golden. No need to thaw—this method preserves the texture and flavor perfectly.
Reheating Methods
The best way to reheat without drying out is to use a hot oven (375°F) for 8‑10 minutes, covering the pizza loosely with foil for the first half to retain moisture, then removing it to let the edges crisp up. Alternatively, a quick blast in the microwave (30 seconds) followed by a minute in a hot skillet restores the meltiness while keeping the base from getting soggy. A splash of water or a few drops of broth added to the skillet before covering can create a gentle steam that keeps the toppings moist.